Sunday, March 11, 2018

Functional Adventures in F# - Calling F# from C#


I have quite a lot of code lying around that is written in C# and going into a new project, the most natural is to start with C# as the core application. Now when I am exploring the functional paradigm with F#, I still want to be able to call all the F# code from C#. In other words, the most natural is to add new functionality to my existing applications using F# and not try to accomplish the 'everything shall be written in F#' utopia.

This post is part of a series:
Functional Adventures in F# - A simple planner
Functional Adventures in F# - Calling F# from C#
Functional Adventures in F# - Using Map Collections
Functional Adventures in F# - Application State
Functional Adventures in F# - Types with member functions
Functional Adventures in F# - Getting rid of loops
Functional Adventures in F# - Getting rid of temp variables
Functional Adventures in F# - The MailboxProcessor
Functional Adventures in F# - Persisting Application State
Functional Adventures in F# - Adding Snapshot Persisting
Functional Adventures in F# - Type-safe identifiers
Functional Adventures in F# - Event sourcing lessons learned

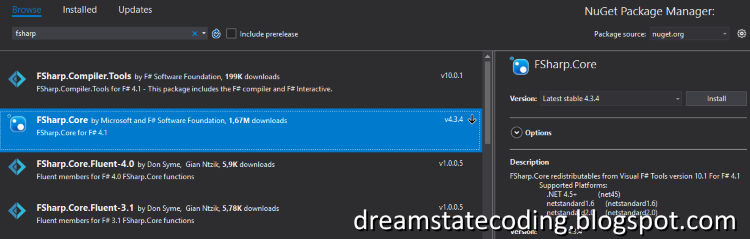
So, first off. We need to give our C# project the knowledge of F# types. So lets Nuget the FSharp.Core package and we are all set!

After that, calling the F# code from C# is easy. Lets use the code that we wrote in the last post with the Planner module.

We had 2 different types described in the module, the ScheduledAction that was a record type and the Schedule that was a list of ScheduledActions.

Lets look at some code:
using System;
using Microsoft.FSharp.Collections;

namespace app.Components
{
    public class Main
    {
        private FSharpList<Planner.ScheduledAction> _schedule;
        public bool Shutdown { get; set; }

        public void MainLoop()
        {
            while (!Shutdown)
            {
                var executableActions = Planner.getExecutableActions(DateTime.UtcNow, _schedule);
                foreach (var action in executableActions)
                {
                    Execute(action);
                    _schedule = Planner.removeFromSchedule(action, _schedule);
                }
            }
        }

        private void Execute(Planner.ScheduledAction action)
        {
            // execute business logic here
        }
    }
}

As you an see, the Schedule type did not follow through as I expected. It is exposed a FSharpList<ScheduledAction>, i.e. we need to write the whole thing instead of just using Schedule. Other then that there seems to be nothing strange here. Planner is identified by intellisense as a class.

If we try to modify the name of the ScheduledAction that we have received from the F# code, the code will not compile but instead show you the error
Property or indexer 'Planner.ScheduledAction.name' cannot be assigned to -- it is read only
This is due to that everything defined in F# is immutable (well almost everything).
So that is that, it just reference the FSharp.Core and your F# project from your C# project and you are good to go.

All code provided as-is. This is copied from my own code-base, May need some additional programming to work. Use for whatever you want, how you want! If you find this helpful, please leave a comment, not required but appreciated! :)

Hope this helps someone out there!

Wednesday, March 7, 2018

OpenGL 4 with OpenTK in C# Part 15: Object picking by mouse


This time we will go through how to use the mouse to pick objects on the screen.

This is part 15 of my series on OpenGL4 with OpenTK.
For other posts in this series:
OpenGL 4 with OpenTK in C# Part 1: Initialize the GameWindow
OpenGL 4 with OpenTK in C# Part 2: Compiling shaders and linking them
OpenGL 4 with OpenTK in C# Part 3: Passing data to shaders
OpenGL 4 with OpenTK in C# Part 4: Refactoring and adding error handling
OpenGL 4 with OpenTK in C# Part 5: Buffers and Triangle
OpenGL 4 with OpenTK in C# Part 6: Rotations and Movement of objects
OpenGL 4 with OpenTK in C# Part 7: Vectors and Matrices
OpenGL 4 with OpenTK in C# Part 8: Drawing multiple objects
OpenGL 4 with OpenTK in C# Part 9: Texturing
OpenGL 4 with OpenTK in C# Part 10: Asteroid Invaders
Basic bullet movement patterns in Asteroid Invaders
OpenGL 4 with OpenTK in C# Part 11: Mipmap
OpenGL 4 with OpenTK in C# Part 12: Basic Moveable Camera
OpenGL 4 with OpenTK in C# Part 13: IcoSphere
OpenGL 4 with OpenTK in C# Part 14: Basic Text
OpenGL 4 with OpenTK in C# Part 15: Object picking by mouse

Introduction

As I've written in previous posts, I'm still not that good with all the math etc. writing these posts is a way for me to learn and hopefully someone else out there finds it useful as well. This time I found a great post that goes into the details of ray-casting to pick objects in 3D space over at Anton Gerdelan's blog: antongerdelan.net/opengl/raycasting.html

I've taken his base solution and made it work with the code-base that we use in this tutorial series. It did not work directly, so a lot of time was spent on what was going wrong.
So, now that credit is where it belongs, lets look at the code.

Code

First we want to calculate the ray from our camera location based on the mouse click on the screen. So first we need to subscribe to mouse events. So in our OnLoad method, we will add the following event handler.
MouseUp += OnMouseUp;

In our event handler we will check that it is the correct button and send the coordinates to the actual object picking method
private void OnMouseUp(object sender, MouseButtonEventArgs mouseButtonEventArgs)
{
    if (mouseButtonEventArgs.Button != MouseButton.Left)
        return;
    PickObjectOnScreen(mouseButtonEventArgs.X, mouseButtonEventArgs.Y);
}

This is the method that calculates the ray from the camera and into the screen. It takes the mouse coordinates and then backtracks the transformations back to world space. For more details, check antongerdelan.net/opengl/raycasting.html.
private void PickObjectOnScreen(int mouseX, int mouseY)
{
    // heavily influenced by: http://antongerdelan.net/opengl/raycasting.html
    // viewport coordinate system
    // normalized device coordinates
    var x = (2f * mouseX) / Width - 1f;
    var y = 1f - (2f * mouseY) / Height;
    var z = 1f;
    var rayNormalizedDeviceCoordinates = new Vector3(x, y, z);

    // 4D homogeneous clip coordinates
    var rayClip = new Vector4(rayNormalizedDeviceCoordinates.X, rayNormalizedDeviceCoordinates.Y, -1f, 1f);

    // 4D eye (camera) coordinates
    var rayEye = _projectionMatrix.Inverted() * rayClip;
    rayEye = new Vector4(rayEye.X, rayEye.Y, -1f, 0f);

    // 4D world coordinates
    var rayWorldCoordinates = (_camera.LookAtMatrix.Inverted() * rayEye).Xyz;
    rayWorldCoordinates.Normalize();
    FindClosestAsteroidHitByRay(rayWorldCoordinates);
}

After that we need to add a method that checks if the game object has been hit by the ray. I added this to the AGameObject class so that all game objects can be picked. Basically we begin by checking if the origin of the ray is inside the sphere that we are checking against. After that we check if the ray is pointing away from the object and lastly we perform Pythagorean method to determine if the ray is within the radius of the sphere that we are looking at. This ray method is something that I've had lying around for a while and used for various purposes.

public double? IntersectsRay(Vector3 rayDirection, Vector3 rayOrigin)
{
    var radius = _scale.X;
    var difference = Position.Xyz - rayDirection;
    var differenceLengthSquared = difference.LengthSquared;
    var sphereRadiusSquared = radius * radius;
    if (differenceLengthSquared < sphereRadiusSquared)
    {
        return 0d;
    }
    var distanceAlongRay = Vector3.Dot(rayDirection, difference);
    if (distanceAlongRay < 0)
    {
        return null;
    }
    var dist = sphereRadiusSquared + distanceAlongRay * distanceAlongRay - differenceLengthSquared;
    var result = (dist < 0) ? null : distanceAlongRay - (double?)Math.Sqrt(dist);
    return result;
}

The above method is called from the following that iterates all the objects currently active in the game and then tries to find the object that is closest (if there are many) to the origin of the ray.

private void FindClosestAsteroidHitByRay(Vector3 rayWorldCoordinates)
{
    AGameObject bestCandidate = null;
    double? bestDistance = null;
    foreach (var gameObject in _gameObjects)
    {
        if (!(gameObject is SelectableSphere) && !(gameObject is Asteroid))
            continue;
        var candidateDistance = gameObject.IntersectsRay(rayWorldCoordinates, _camera.Position);
        if (!candidateDistance.HasValue)
            continue;
        if (!bestDistance.HasValue)
        {
            bestDistance = candidateDistance;
            bestCandidate = gameObject;
            continue;
        }
        if (candidateDistance < bestDistance)
        {
            bestDistance = candidateDistance;
            bestCandidate = gameObject;
        }
    }
    if (bestCandidate != null)
    {
        switch (bestCandidate)
        {
            case Asteroid asteroid:
                _clicks += asteroid.Score;
                break;
            case SelectableSphere sphere:
                sphere.ToggleModel();
                break;
        }
    }
}

As you can see above, we have introduced a new GameObject for this part of the tutorial series, the SelectableSphere. It looks like the following:
public class SelectableSphere : AGameObject
{
    private ARenderable _original;
    private ARenderable _secondaryModel;
    public SelectableSphere(ARenderable model, ARenderable secondaryModel, Vector4 position, Vector4 direction, Vector4 rotation)
        : base(model, position, direction, rotation, 0)
    {
        _original = model;
        _secondaryModel = secondaryModel;
    }


    public override void Update(double time, double delta)
    {
        _rotation.Y = (float) ((time + GameObjectNumber) * 0.5);
        var d = new Vector4(_rotation.X, _rotation.Y, 0, 0);
        d.Normalize();
        _direction = d;
        base.Update(time, delta);
    }

    public void ToggleModel()
    {
        if (_model == _original)
            _model = _secondaryModel;
        else
            _model = _original;
    }
}
Basically an endlessly rotating sphere that will toggle its model when selected.

And lastly we generate these spheres in 2 layers in the OnLoad method in our MainWindow to have stuff on screen that can be selected.
var maxX = 2.5f;
var maxY = 1.5f;
for (float x = -maxX; x < maxX; x += 0.5f)
{
    for (float y = -maxY; y < maxY; y += 0.5f)
    {
        _gameObjects.Add(_gameObjectFactory.CreateSelectableSphere(new Vector4(x, y, -5f, 0)));
    }
}
for (float x = -maxX; x < maxX; x += 0.65f)
{
    for (float y = -maxY; y < maxY; y += 0.65f)
    {
        _gameObjects.Add(_gameObjectFactory.CreateSelectableSphereSecondary(new Vector4(x, y, -6f, 0)));
    }
}


End results


For the complete source code for the tutorial at the end of this part, go to: https://github.com/eowind/dreamstatecoding

So there, thank you for reading. Hope this helps someone out there : )


Sunday, March 4, 2018

Functional Adventures in F# - A simple planner


Last year when I got sick I bought the openGL Bible and started writing about graphics programming with openTK in C# just to keep my mind occupied.
This year things turned bad again, so a new book... This time it is time for F# as I got really curious about functional programming during the last few months.

This post is part of a series:
Functional Adventures in F# - A simple planner
Functional Adventures in F# - Calling F# from C#
Functional Adventures in F# - Using Map Collections
Functional Adventures in F# - Application State
Functional Adventures in F# - Types with member functions
Functional Adventures in F# - Getting rid of loops
Functional Adventures in F# - Getting rid of temp variables
Functional Adventures in F# - The MailboxProcessor
Functional Adventures in F# - Persisting Application State
Functional Adventures in F# - Adding Snapshot Persisting
Functional Adventures in F# - Type-safe identifiers
Functional Adventures in F# - Event sourcing lessons learned

So previous experience with functional ideas are from web tech like Redux and writing the core engine of my latest game project in C# with functional constructs. If you want to know more about that project you can read here:
Functional adventures in .NET C# - Part 1, Immutable Objects
Functional adventures in .NET C# - Part 2, Application State

So, next step is to actually use a language that is built for this. And luckily in .NET there is a full featured one.

At first I thought about converting a already existing piece of C# to F# to see the similarities and differences but I quickly omitted that idea. So for the next few posts I will try to write a Scheduler with F#.

If you do not have any development environment, please check out Visual Studio Community Edition, it is a great and free environment that I use for my private projects. It has support for F#.

Defining data

As a first step we need to define the different types of data that we have.

Step 1, decide if we should use CLI types or F# specific types.

CLI Types: Standard types that can be used in all .NET languages
F# Types: Specific to F#, cannot be used outside. Designed with functional paradigm in mind and does not have null and are immutable. They also have built in equality checking and pretty printing.

Our choice here will be F# types to be able to use the language to its full extent as it was designed.
As a starter, we want to be able to build a collection of planned Actions. So lets first define what we will be planning.
type ScheduledAction = { time:DateTime; name:string; }
This pretty much describes a new Record type that has a time and a name.
Next lets define the Schedule as an ImmutableSortedSet
type Schedule = ScheduledAction list
Nothing fancy here either, as you can see compared to C# the order of things is switched, where we would write list<ScheduledAction> we just write ScheduledAction litinstead. I think you can use the C# notation as well but I am trying to stick with the way my book says is the F# way.

Adding functionality

Next we will want to add a ScheduledAction to the current Schedule. As everything is immutable we will define a function that takes the new ScheduledAction and the current Schedule, and returns a new Schedule with the ScheduledAction added to it. We will not change the current Schedule, just return a new Schedule with the change made to it.
So just add a new item.
let schedule (action:ScheduledAction) (currentPlan:Schedule) =
    let newPlan = action :: currentPlan
    newPlan
Here we define the function schedule that takes 2 arguments: action and currentPlan. The parenthesis are not needed if you do not supply the type arguments. But my compiler complained (FS0613 Syntax error in labelled type argument) if I didn't add them so hence the parenthesis.
The item :: tail construct takes an item and a list and returns a new list with the item as the first item and the tail as ... the tail.

Next step is to retrieve actions that should be executed. So lets define a new function, this will not change the plan, just return a new list with items that should be executed.
let getExecutableActions (currentTime:DateTime) (currentPlan:Schedule) =
    let actions = List.filter (fun x -> x.time <= currentTime) currentPlan
    actions
Here we use the List.filter function to apply a filter to each item in the list. As Schedule is a list this works fine.

Finally we want to remove items that have been executed (in some way, outside of scope here).
let removeFromSchedule (action:ScheduledAction) (currentPlan:Schedule) =
    let newPlan = List.filter (fun x -> compare x action <> 0) currentPlan
    newPlan
Basically the method is the same as the above, but it compares each element in the list to the one we want to remove, and if it is the one we want to remove, we just do not add it to the new list. I.e. filter it away.

The complete planner module

namespace scheduler

module Planner =
    open System
    type ScheduledAction = { time:DateTime; name:string;}
    type Schedule = ScheduledAction list

    let schedule (action:ScheduledAction) (currentPlan:Schedule) =
        let newPlan = action :: currentPlan
        newPlan

    let getExecutableActions (currentTime:DateTime) (currentPlan:Schedule) =
        let actions = List.filter (fun x -> x.time <= currentTime) currentPlan
        actions

    let removeFromSchedule (action:ScheduledAction) (currentPlan:Schedule) =
        let newPlan = List.filter (fun x -> compare x action <> 0) currentPlan
        newPlan
So here we have the complete planner in 18 lines of code.

Adding unit tests

Of course we should have unit tests to ensure correct functionality. Luckily F# makes it quite easy to write tests as well.
namespace scheduler.tests

open System
open Microsoft.VisualStudio.TestTools.UnitTesting
open scheduler
open scheduler.Planner

[<TestClass>]
type PlannerTests () =

    [<TestMethod>]
    member this.Planner_schedule_AddItemToEmptySchedule () =
        let item : ScheduledAction = { time = DateTime.UtcNow; name = "first item" }
        let target : Schedule = []
        let newSchedule = schedule item target
        Assert.AreEqual(item, newSchedule.Head);
  
    [<TestMethod>]
    member this.Planner_schedule_AddItemToNonEmptySchedule () =
        let item : ScheduledAction = { time = DateTime.UtcNow; name = "first item" }
        let item2 : ScheduledAction = { time = DateTime.UtcNow; name = "second item" }
        let target : Schedule = []
        let intermediateSchedule = schedule item target
        let newSchedule = schedule item2 intermediateSchedule
        Assert.AreEqual(item2, newSchedule.Head);
        Assert.AreEqual(2, newSchedule.Length);

For the schedule function, we add 2 tests, one that adds a new item to an empty Schedule, and one that adds an extra item to a Schedule that already has items.
       
    [<TestMethod>]
    member this.Planner_getExecutableActions_EmptySchedule () =
        let target : Schedule = []
        let actual = getExecutableActions DateTime.UtcNow target
        Assert.AreEqual(0, actual.Length);

   
    [<TestMethod>]
    member this.Planner_getExecutableActions_SingleItemSchedule_NoExecutable () =
        let currentTime = DateTime.UtcNow;
        let item : ScheduledAction = { time = currentTime; name = "first item" }
        let target : Schedule = []
        let newSchedule = schedule item target
        let currentTime = currentTime.AddSeconds(-2.0);
        let actual = getExecutableActions currentTime newSchedule
        Assert.AreEqual(0, actual.Length);
 
 
    [<TestMethod>]
    member this.Planner_getExecutableActions_SingleItemSchedule_SingleExecutable () =
        let currentTime = DateTime.UtcNow;
        let item : ScheduledAction = { time = currentTime; name = "first item" }
        let target : Schedule = []
        let newSchedule = schedule item target
        let currentTime = currentTime.AddSeconds(2.0);
        let actual = getExecutableActions currentTime newSchedule
        Assert.AreEqual(1, actual.Length);

    [<TestMethod>]
    member this.Planner_getExecutableActions_MultiItemSchedule_SingleExecutable () =
        let currentTime = DateTime.UtcNow;
        let item : ScheduledAction = { time = currentTime.AddYears(1); name = "first item" }
        let item2 : ScheduledAction = { time = currentTime; name = "second item" }
        let target : Schedule = []
        let intermediateSchedule = schedule item target
        let newSchedule = schedule item2 intermediateSchedule
        let currentTime = currentTime.AddSeconds(2.0);
        let actual = getExecutableActions currentTime newSchedule
        Assert.AreEqual(item2, actual.Head);
        Assert.AreEqual(1, actual.Length);
For the getExecutableActions function we add 4 tests.

  • One that checks so that the special case of an empty Schedule is handled correctly. 
  • Secondly that the time filter is correct when we have a single item in the list that is not OK to execute yet. 
  • Thirdly a single item that is OK to execute
  • and lastly a Schedule with multiple items with 1 able to execute and 1 not able to

    [<TestMethod>]
    member this.Planner_removeFromSchedule_RemoveItem () =
        let item : ScheduledAction = { time = DateTime.UtcNow; name = "first item" }
        let item2 : ScheduledAction = { time = DateTime.UtcNow; name = "second item" }
        let target : Schedule = []
        let intermediateSchedule = schedule item target
        let newSchedule = schedule item2 intermediateSchedule
        let actual = removeFromSchedule item newSchedule
        Assert.AreEqual(item2, actual.Head);
        Assert.AreEqual(1, actual.Length);
And lastly we check that removeFromSchedule function does just that, removes the item we want to remove and leaves the rest in the list. (in the new list that is returned, the original is not changed... remember immutable)


All code provided as-is. This is copied from my own code-base, May need some additional programming to work. Use for whatever you want, how you want! If you find this helpful, please leave a comment, not required but appreciated! :)

Hope this helps someone out there!